
The Grove is Banana Society's shared jungle: six named areas connected by crossings and paths, with four collection crates and a central council clearing. Learn the landmarks first. A recognizable place name is useful both for navigation and for explaining evidence.
Read the map
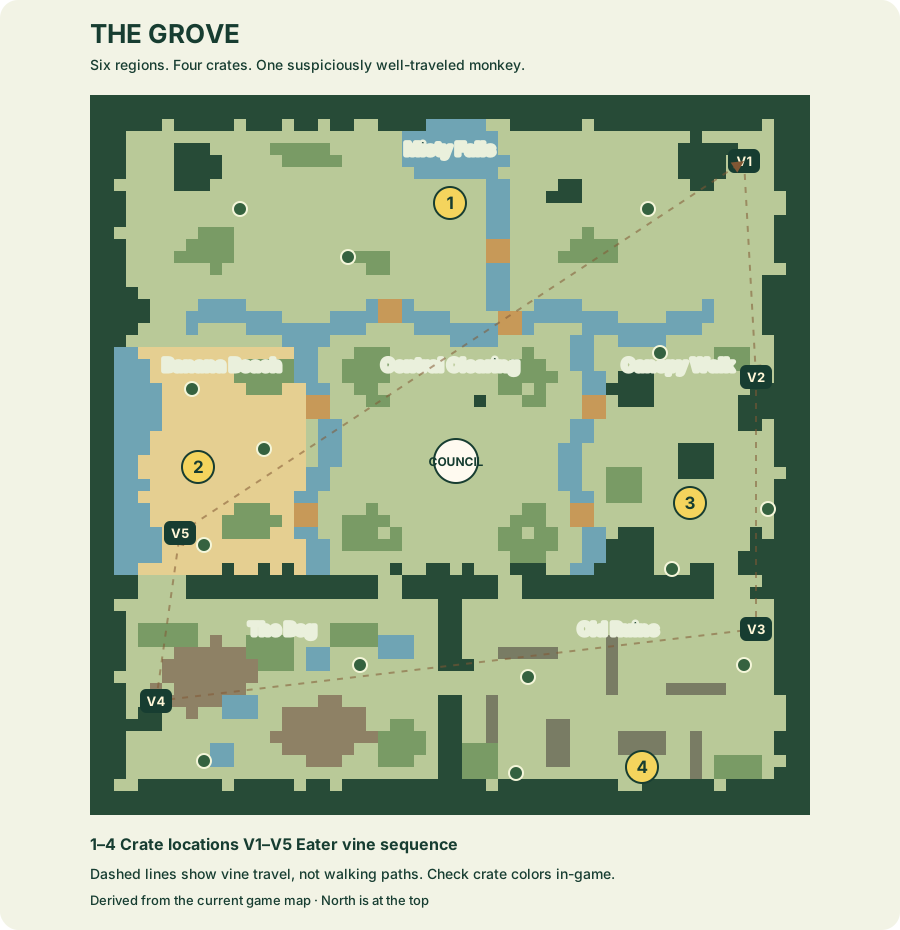
This diagram is generated from the same compiled terrain and object positions the game uses. It is a navigation diagram, not a screenshot. The numbered crate markers identify locations, not banana-color assignments. Check each crate's actual color in the match.
Open the full in-game map with N, or toggle the minimap with M. Use the live map when navigating a round; host settings and future map updates can change what you need to plan around.
Six areas to recognize
| Area | Landmark or terrain | A useful orientation cue |
|---|---|---|
| Misty Falls | The northern waterfall and river. | Find the northern crate near the water before choosing a crossing. |
| Banana Beach | Sand and the shipwreck to the west. | The western crate sits in the beach area. Bridges connect toward the clearing. |
| Central Clearing | Council gathering place and Coconut Alarm. | A shared reference point for describing routes across the middle. |
| Canopy Walk | The eastern elder tree area. | Locate the eastern crate and the crossings back toward the center. |
| The Bog | Southern-western mud and the idol. | Recognize the terrain before following a route into the southern map. |
| Old Ruins | Temple and ruin walls to the southeast. | The southern crate is near the ruins; walls make route choice matter. |
Plan a collection trip
Choose the crate that matches the bananas you carry, not simply the nearest marker. Under standard rules, a crate rejects other colors.
Look for a crossing before walking straight toward your destination. A direction across water is not necessarily a walkable route. Terrain, walls, and bridges matter more than the shortest line drawn on this diagram.
For your first practice match, connect three places: one tree, the correct crate, and the central clearing. Add another route once those landmarks feel familiar.
The five-vine sequence
The vine labels V1–V5 show the ordered travel loop used by Eaters:
- V1: northeast, near the top of Misty Falls.
- V2: eastern side, near the top of Canopy Walk.
- V3: southeast edge, near the southern regions.
- V4: southwest, in The Bog.
- V5: western side near Banana Beach, then back to V1.
Use E at a vine to travel to the next one. Citizens do not receive this movement ability. The diagram's dashed connection indicates the travel order, not a walking path.
Use locations as evidence
A place name helps a council reconstruct what happened. “I saw the carrier at the beach crate, then crossed into the clearing” contains a route somebody else might recognize.
A map does not give you perfect information about everybody's actions. Distinguish seeing a monkey near a landmark from seeing it steal, eat, or deposit. Limited vision and walls can leave gaps in your account.
Citizens can use recognizable routes to collect and compare observations. Eaters can study the same routes to understand where an action may be witnessed. See the Citizen strategy and Eater strategy guides for examples.
Meet us in The Grove.
Free browser play. Bring your friends, or learn the controls with bots.
Play free